If you bought your Starview 7 from http://www.starview7.com/ you will have also revived a coax cable, Splitter and an Ethernet cable. if not (Order £9.95)
Starview 7 Box Contents
- Starview 7 Official Set-top Box
- Starview 7 Official LAN Adapter
- Ethernet Cable (3metre)
- Coax Cable (3 meter)
- Manual
Description of contents
Starview 7 Official Set-top box - Reviver of free to air channels
Starview 7 Official Set-top box - Reviver of free to air channels
Starview 7 Official LAN Adapter - connects to the serial port and enabling the LAN connection
Ethernet Cable (3metre) - used to connected between the LAN adapter and the router
Coax Cable (3 metre) - used to connect between the cable supplier and the Starview 7 set-top box
Manual - information regarding use of the Starview 7
Ethernet Cable (3metre) - used to connected between the LAN adapter and the router
Coax Cable (3 metre) - used to connect between the cable supplier and the Starview 7 set-top box
Manual - information regarding use of the Starview 7
Other equipment required
Router - Enables multiple internet connections "this is only required if the user only has one LAN port on their modem" i also would not recommend belkin routers for use with the Starview 7 as they have intermittent loss of connection thus causing the box the jump and stutter, although this can be resolved but advised for advanced users only.
Scart lead - connection from Starview 7 to the Television
RF Cable - if scart lead connection from Starview 7 to the Television is unavailable.
Please note: i would also only recommended wired (Ethernet) connections from the router to the Starview 7 as other means of connections ie poweline adapters, access points or range extenders etc can simply add more variables or issues to connectivity, where as a simply cable connection is reliable and if you do have issues with connectivity you can simply rule the issue out (Router? or Box?)
NOW LETS GET STARTED!
Simply unpack the settop box removing all the packaging. once all the packaging is removed simply place the starview 7 where required for easiest connection to your television and also your internet router.
Below is a simple diagram of what you outcome should look like!
Step 1 (Remove packaging)
Take the Starview 7 out of the packaging removing the contents of the box should look like this;
Step 2 ( Identify Internet connection)
There is only two main-stream types of internet connection that you could possibly have in the UK.There are other forms of broadband in the uk but where only interested in the 2 most common, as below;
1) DSL (Virgin fiber optic broadband)
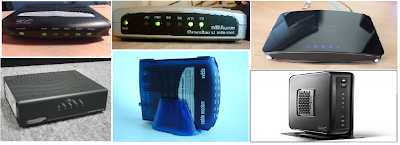
This can be identifies as you will receive a broadband modem from virgin, there are currently several virgin modems on the market but simply look for a device that had either the Virgin or NTL marking on it.
 |
| Virgins Current Modems |
2) ADSL (BT based internet)
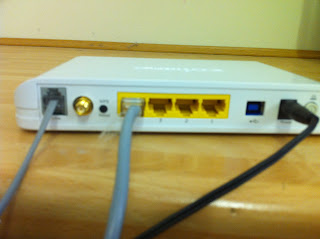
BT based internet meaning that your internet connection through a phone line. ADSL connections are provided by Internet service providers such as BT, Sky, TalkTalk, AOL ect.
 |
| ADSL Router! note that there is a telephone RJ11 Socket plugged into the left hand side on the router |
Step 3 (Router or Not?)
You will find that most internet service providers supply a router, although if you had your internet installed pre 2008 there is a possibility that that you will require a router! a router is required simply to enable your internet connection to connect to multiple devices!
Virgin Customers
If your a Virgin customer i'd advise the Dlink 615 Wireless Router, these can be picked up at most computer stores.
Get GET FREE 10MB BROADBAND
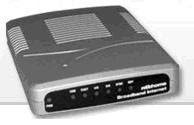
If your a virgin customer some of virgin customers are still using the old ambit 100 or 120 modem this can be identified as the gray modem that has NTL markings on the modems, this modem is only capable of download speeds of upto 5mbps and every virgin customer on the minimum packages are entitled to 10MB
 |
| Old NTL 100 or 120 Modem (Slow & Makes SV7 Crash ) |
ALSO this modem appears to have issues with the Starview 7 (CAUSING IT TO JUMP AND CRASH) therefore i would advice customers to call virgin on 012556752000 or call 151 from your virgin telephone and advise the customer service representative that no power is going into the modem at all, be sure to unplug the modem before making the call, and when the CSR asked you to perform checks on the modem just simply inform them ABRUPTLY that the modem is plugged in at the socket and at the back of the modem and no lights are showing, they will then send you a replacement ambit 256 modem capable of doing 10mb within 2 working days, with instructions of how to activate and get back online!
ADSL (BT Based lines)
If you are connected to a ADSL BT based line i would simply advise to contact your service provider and request that they send you a new router/modem as your existing one is faulty (BLAG IT). obviously if your paying for a service and are unable to receive the service they are a liberty to provide you with the necessary means to use that service that you the customer are paying for!
Step 4 (Starview LAN Connection to Starview 7 Serial Port)
Step 5 (Connect Ethernet from Router to Starview LAN)
Now that you have the Ethernet cable plugged into the Starview 7 LAN adapter, plug the other end of the Ethernet cable into into your router. most routers have the lan ports marked with either the word "LAN" or a number adjacent to the ports, at the rear of your router.
Step 6 (Scart or RF connection to Television from Starview 7)
This step is simple, you need to now decide which connection you want to use to connect your Starview 7 to the TV.
We have two options on the Starview 7, either the scart lead or the RF cable. My advice would to simply use the scart lead as it is the easiest option as it simply means that you connect the lead and select the AV source on your television, where as using the RF option means that you will be required to tune the television in, to do this you will have to look in your television manual.
Step 7 (Coax Cable From Cable Provider to Starview 7)
Step 8 (Power on Box)
Now Simply plug in the starview 7 to the power socket and turn on the power switch at the left rear of the box. Wait for the box to boot and the following screen should appear on your television! provided that you have followed this guide correctly!
If the above screen does not appear make sure you are set the the correct AV channel if using scart lead or the correct RF channel if using RF cable.
You next Step is the installation. go to our installation section or click below.


What a fantastic setup! And, what a huge energy bill he must have. Ouch.
ReplyDeleteI've been playing with my own mini setup in a used rack. Photo part way down the page and so many Telecom Support Services that is beneficial for both students as well as working professionals.
Internet Connection Setup Melbourne
cannot get internet connection to box, have tried retuning but have now got no channekls atall any suggestions??
ReplyDeletehelp my internet wont connect it says ....
ReplyDeletethats all
how can I get the channels back on my starview 7 box I bought second hand pls
ReplyDeletemy box gone off saying error message and no signal
ReplyDeleteCan't get any channels says no signal
ReplyDelete